LMS Addon : Settings
The LMS Addon all main features can be controlled and customized from this settings section. Mainly the General Settings, Assigning Settings, Commission settings, Point Of Contact settings, Import settings, Skin settings and Typography Settings.
This dashboard gives us details about Total Items created by the administrator and all instructors. And all the details separately like All Courses, All Classes, All Packages, All Student Details, All Instructor Details, Commission Details, Instructing Items, My Courses, etc.
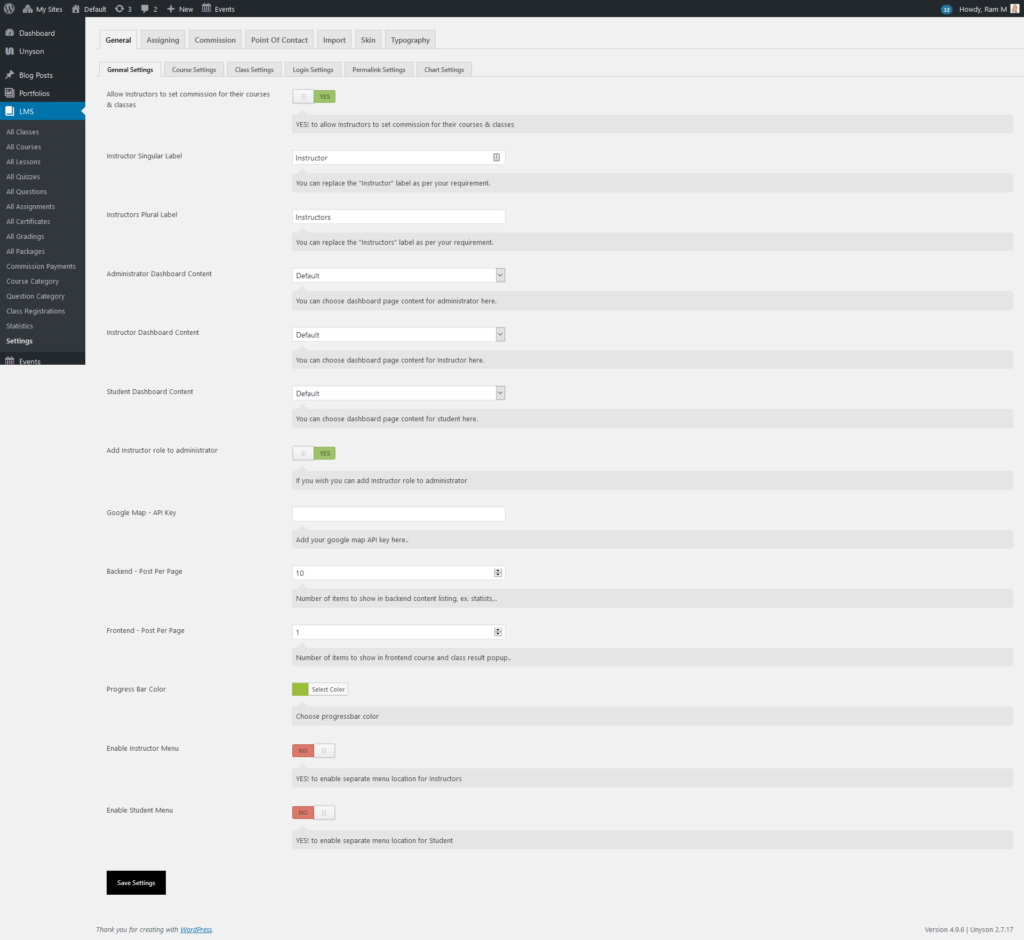
GENERAL SETTINGS
1. Allow Instructors to set commission for their courses & classes– You can enable or disable this option to allow Instructors to set commission for their courses & classes. If it is not enabled, then the Set Commission tab will not be viewed by the Instructor.
2. Instructor Singular Label – Here you can set your instructor singular label. This will update the instructor label throughout the site.
For E.g: Instructor / Author / Teacher
3. Instructors Plural Label – Here you can set your instructor plural label. This will update the instructor label throughout the site.
For E.g.: Instructors / Authors / Teachers
4. Administrator Dashboard Content – Here you can choose the page for administrator dashboard. You can design your own admin dashboard using the Visual Composer available modules or the shortcodes available in a new page and choose that page in this dropdown. If not chosen, the default page layout will be applied for the Administrator Dashboard.
5. Instrutor Dashboard Content – Here you can choose the page for Instrutor dashboard. You can design your own admin dashboard using the Visual Composer available modules or the shortcodes available in a new page and choose that page in this dropdown. If not chosen, the default page layout will be applied for the Instrutor Dashboard.
6. Student Dashboard Content – Here you can choose the page for Student dashboard. You can design your own admin dashboard using the Visual Composer available modules or the shortcodes available in a new page and choose that page in this dropdown. If not chosen, the default page layout will be applied for the Student Dashboard.
7. Add Instructor role to administrator – You can enable or disable this option to add Instructor role to administrator. If you wish you can enable this option to act Instructor as administrator. If this is enabled the administrator will also be listed in the dropdowns where the instructors are listed.
8. Google Map – API Key – Here you can add your google map API key. The Google maps are shown in Onsite Class pages in the location tab and also in the same Onsite Class page backend there is feature to get the GPS Location. For these 2 features this API key field is needed. To generate a new API key, please click the link below.
https://developers.google.com/maps/documentation/javascript/get-api-key
9. Backend – Post Per Page – Enter the number of items to show in backend content listing, ex. statistics,
10. Frontend – Post Per Page – Enter the number of items to show in front-end course and class result popup.
Progress bar Color – You can choose your own progress bar color. Select a color from progress bar color palette.
11. Enable Instructor Menu – If you wish you can enable this option to get a separate menu location for Instructors. If any Instructors login to the site, and if any menu items are assigned to that menu location, then that menu items will be shown for the instructor.
12. Enable Student Menu – If you wish you can enable this option to get a separate menu location for Student. If any Student login to the site, and if any menu items are assigned to that menu location, then that menu items will be shown for the student.
COURSE SETTINGS
- Enable Count Down Timer – Course Start Date– If the Courses start date is set for any future dates, then you can use this feature to enable the Count Down timer, until the course gets started.
- Enable Contact Instrutor Options In Course Page– If this option is enabled, the course details page will have the option to send message through buddypress plugin or send email to the instructor.
- Course Prerequisite – On Complete– Once this option is enabled, student will have to wait for prerequisite course to be evaluated. By default its enough if prerequisite course is submitted by student. Hope the Course Prerequisite is already explained in the Course details page.
- Curriculum Visibility –– You can enable/disable the Curriculum tab in the course details page based the dropdown selection in this section. You can show/hide the curriculum tab to Everyone, Logged In Users, Purchased Users, Instructors and Administrators.
- Members Visibility –– Similar to the Curriculum Visibility, you can show/hide the Members tab to Everyone, Logged In Users, Purchased Users, Instructors and Administrators.
- Events Visibility – – Similar to the Curriculum Visibility, you can show/hide the Events tab to Everyone, Logged In Users, Purchased Users, Instructors and Administrators.
- BuddyPress Group Visibility – – Similar to the Curriculum Visibility, you can show/hide the Group tab to Everyone, Logged In Users, Purchased Users, Instructors and Administrators.
- News Visibility – – Similar to the Curriculum Visibility, you can show/hide the News tab to Everyone, Logged In Users, Purchased Users, Instructors and Administrators.
CLASS SETTINGS
- Class Singular Label– Here you can set your Class singular label. This will update the Class label throughout the site.
- Classes Plural Label– Here you can set your Classes singular label. This will update the Classes label throughout the site.
- Enable Count Down Timer – Class Start Date– If the Classes start date is set for any future dates, then you can use this feature to enable the Count Down timer, until the class gets started.
- Enable Contact Instructor Options In Class Page –– You can enable/disable the Curriculum tabin the course details page based the dropdown selection in this section. You can show/hide the curriculum tab to Everyone, Logged In Users, Purchased Users, Instructors and Administrators.
- Class Registration – Without Login –– If you want the users to allow to Apply for Onsite courses without logging in, this option can be used. If this option is enabled, the logged out users can see the “Register” buttonfor applying the onsite course. If this is not enabled, then the logged out users can see “Login to Apply” button for applying for the onsite course. By clicking the “Login to Apply” button the login popup will be opened.
- Include Class In Commission – – If you like to include Classes in commission settings choose “Yes”. If this option is not included, then the classes section will not be included in the Set Commission feature.
Class Settings
- LOGIN SETTINGS
- Enable Facebook Login– Enable the facebook login feature from this option.
- App Id– Enter the Facebook App Id needed for the facebook login.
- App Secret– Enter the Facebook App Secret needed for the facebook login.
- Enable Google Login – Enable the Google Login feature from this option.
- Client Id– Enter the Facebook Client Id needed for the Google login.
- Client Secret – Enter the Facebook Client Secret needed for the Google login.
- Administrator Login Redirect Page – If the administrator login from frontend, then choose a page where the administrator needs to be redirected after login. You can choose any pages from the dropdown list.
- Instrutor Login Redirect Page – If the Instructor login from frontend, then choose a page where the Instructor needs to be redirected after login. You can choose any pages from the dropdown list.
- Student Login Redirect Page – If the student logs in, then choose a page where the student needs to be redirected after login. You can choose any pages from the dropdown list.
PERMALINK SETTINGS
- Course Slug– From this option you can change the slug of the Courses details page. You can set the course page slug whatever needed. Do not use characters which are not allowed in links/urls. After updating the slug, go to Settings > Permalinks and click Save changes twice.
- Course Category Slug– From this option you can change the slug of the Course Category page. You can set the course category page slug whatever needed. Do not use characters which are not allowed in links/urls. After updating the slug, go to Settings > Permalinks and click Save changes twice.
- Class Slug– From this option you can change the slug of the Class details page. You can set the class page slug whatever needed. Do not use characters which are not allowed in links/urls. After updating the slug, go to Settings > Permalinks and click Save changes twice.
CHART SETTINGS
-
-
- Color Options– We do have 12 color palette selectors for the PIE chart and Bar Chart. You can select your own colors for all the 12 color palettes. Those 12 colors will be shown in the PIE Chart and Bar chart one by one for each items.
- Shuffle Colors– If you enable this option, the 12 colors will be shuffled upon in the PIE chart and Bar Chart for each page load.
- Legend Position– The Legends position can be changed to Top, Right, Bottom or Left.
-
Assigning Settings
From this assigning settings tab you can assign the Courses to Students, Students to Courses, Classes to Students and Students to Classes.
Note: Admin only can make these settings.
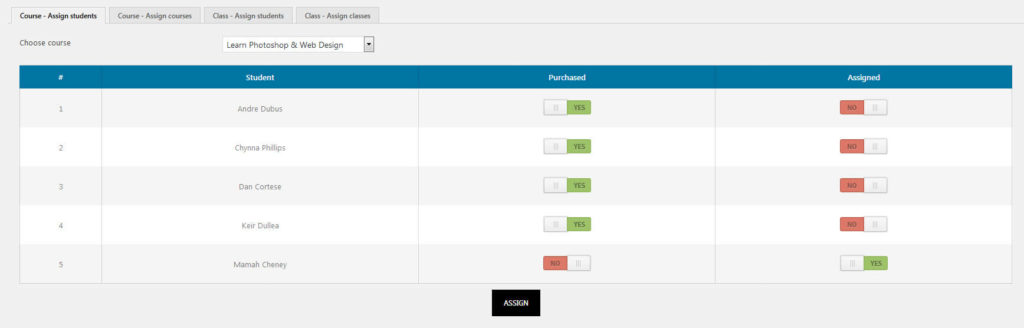
Course – Assign students
From this section, the admin can assign courses to individual stduents directly. Just select the course which needs to be assigned to the students, and the list of all students will be loaded. Just switch the button to “Yes” in the assigned column for the particular student and click “Assign” button at the bottom and the course will be assigned to that student automatically. The “Purchased” column shows whether the course is already purchased by the student or not.
Course – Assign courses
From this section, the admin can assign students to individual courses directly. Just select the student who needs to be assigned to the course, and the list of all courses will be loaded. Just switch the button to “Yes” in the “Assigned” column for the particular course and click “Assign” button at the bottom and the student will be assigned to that course automatically. The “Purchased” column shows whether the student has already purchased that course or not.
Class – Assign students
From this section, the admin can assign classes to individual stduents directly. Just select the class which needs to be assigned to the students, and the list of all students will be loaded. Just switch the button to “Yes” in the assigned column for the particular student and click “Assign” button at the bottom and the class will be assigned to that student automatically. The “Purchased” column shows whether the class is already purchased by the student or not.
Class – Assign classes
From this section, the admin can assign students to individual classes directly. Just select the student who needs to be assigned to the class, and the list of all classes will be loaded. Just switch the button to “Yes” in the “Assigned” column for the particular class and click “Assign” button at the bottom and the student will be assigned to that class automatically. The “Purchased” column shows whether the student has already purchased that class or not.
Commission
In commission settings tab the administrator or the instructor can set the commission for the particular instructor or pay the commission for the particular instructor.
Set Commission
From this Set Commission tab the administrator can set the commission percentage for the particular instructor. Just select the Particular Instructor for which the Commission needs to be set and the Courses, Classes posted by the Instructor will be listed in a table format and there will be listed the price of the Course/Class and a number type textbox will be there for each Course/Class. Just mentioned the percentage (%) of the commission that needs to be set for the particular Course/Class and click “Save Settings”. Thats it!!!
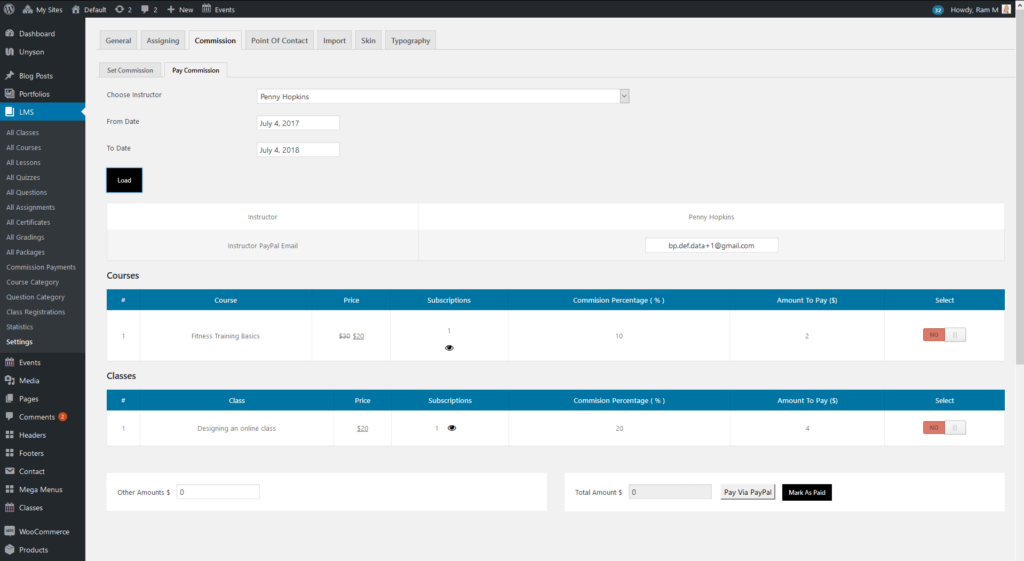
Pay Commission
From this Pay Commission tab only the administrator can pay the commission percentage for the particular instructor. Just select the Particular Instructor for which the Commission needs to be paid and select the “From Date”, “To Date” and the Courses, Classes posted by the Instructor along with the Subscriptions, Commision Percentage ( % ), Amount To Pay ($) will be listed in a table format. Also there will be a textbox for “Instructor PayPal Email”. The administrator needs to fill the paypal email of that particular instructor for making payment via paypal. Just select the Course/Class for which the commission is going to be paid from the Select Column by switching the button to “Yes”. Once the button is switched to “Yes”, the total amount will be automatically loaded. If you have any other amount to be paid for the instructor, just add that amount in Other Amount textbox and it will be added to the Total Amount ($) textbox.
Now Click the button “Pay Via Paypal” and a new tab will be opened to Paypal page with the amount that needs to be paid for that particular instructor. The administrator can make the payment from his paypal account. After that return back to the same Pay Commission page and click the button “Mark As Paid”. This step needs to be done manually, since automatically we cannot detect if the payment from paypal is made or not.
Point Of Contact
In point of contact settings tab you can customize the settings to select your Email Template Page, Email Subject Prefix and you can enable or disable the options to send Email and Notification to the Student and Instructor. Make sure “BuddyPress” plugin is activated for notification concept. The Notifications will be shown in the frontend
1) Email Template Page – You can create your own template as page and you can choose your Email template page from email template page dropdown.
2) Email Subject Prefix – If you wish, you can set your own email subject prefix here. It will display the email subject prefix of receiving mail of the Student and Instructor.
You can enable or disable the following options to send Email and Notification to the Student and Instructor.
3) New Course Added – If you wish, you can enable this option to receive Email and Notification to the Student and Instructor when a new course added by the admin or an instructor.
4) Course Subscribed Student – If you wish, you can enable this option to receive Email and Notification to the Student and Instructor when the course has been subscribed by the student.
5) Course Subscription Cancellation – If you wish, you can enable this option to receive Email and Notification to the Student and Instructor when a student cancelled the subscribed course.
6) Course Assigned – If you wish, you can enable this option to receive Email and Notification to the Student and Instructor when a course assigned to the student by the admin.
7) Course Started – If you wish, you can enable this option to receive Email and Notification to the Student and Instructor when a student started the course.
8) Course Submitted – If you wish, you can enable this option to receive Email and Notification to the Student and Instructor when the course has been submitted by the student.
9) Course Evaluated – If you wish, you can enable this option to receive Email and Notification to the Student and Instructor when the course has been evaluated by the course instructor.
10) Course Certificate Achieved – If you wish, you can enable this option to receive Email and Notification to the Student and Instructor when the student achieved the certificate by grading the course by the course instructor.
11) Course Badge Achieved – If you wish, you can enable this option to receive Email and Notification to the Student and Instructor when the student achieved the badge by grading the course by the course instructor.
12) Course Submission Revoke – If you wish, you can enable this option to receive Email and Notification to the Student and Instructor when the course instructor revokes the course submission by the student.
13) Course Drip Content Agenda – If you wish, you can enable this option to receive Email for the course drip content agenda to the Student and Instructor when the course has been subscribed by the student.
14) Package Subscribed – If you wish, you can enable this option to receive Email and Notification to the Student and Instructor when a package has been subscribed by the student.
15) Package Subscription Cancellation – If you wish, you can enable this option to receive Email and Notification to the Student and Instructor when a student cancelled the Package Subscription.
16) New Class Added – If you wish, you can enable this option to receive Email and Notification to the Student and Instructor when a new class added by the admin or an instructor.
17) Class Subscribed – If you wish, you can enable this option to receive Email and Notification to the Student and Instructor when the class has been subscribed by the student.
18) Class Subscription Cancellation – If you wish, you can enable this option to receive Email and Notification to the Student and Instructor when a student cancelled the subscribed class.
19) Class Assigned – If you wish, you can enable this option to receive Email and Notification to the Student and Instructor when a class assigned to the student by the admin.
20) Class Submitted – If you wish, you can enable this option to receive Email and Notification to the Student and Instructor when the class has been submitted by the student.
21) Class Evaluated – If you wish, you can enable this option to receive Email and Notification to the Student and Instructor when the class has been evaluated by the course instructor.
22) Class Certificate Achieved – If you wish, you can enable this option to receive Email and Notification to the Student and Instructor when the student achieved the certificate by grading what are the courses included in the class by the course instructor.
23) Class Badge Achieved – If you wish, you can enable this option to receive Email and Notification to the Student and Instructor when the student achieved the badg by grading what are the courses included in the class by the course instructor.
24) Class Submission Revoke – If you wish, you can enable this option to receive Email and Notification to the Student and Instructor when the course instructor revokes the class submission by the student.
Instructor Notification Panel:
The instructor notification panel can be accessed by the following steps.
1. Login as instructor
2. The page will be redirected to the instructor dashboard or Buddypress dashboard(if buddypress dashboard page is selected from LOGIN SETTINGS)
3. If it is Normal Intructor Dashboard you can view the notifications from the WordPress admin bar > Hover the Name ( Top right corner) > Notiifications.
4. The notifications section in the buddypress dashboard will be opened.
5. The instructor can mark the notifications as Read and Unread from the options.
Student Notification Panel:
The Student notification panel can be accessed by the following steps.
1. Login as student
2. The page will be redirected to the Student Buddypress dashboard (if student buddypress dashboard page is selected from LOGIN SETTINGS)
3. From the notifications section, the student can view all the notifications that has been received for him. The student mark the notifications as Read and Unread from the options.
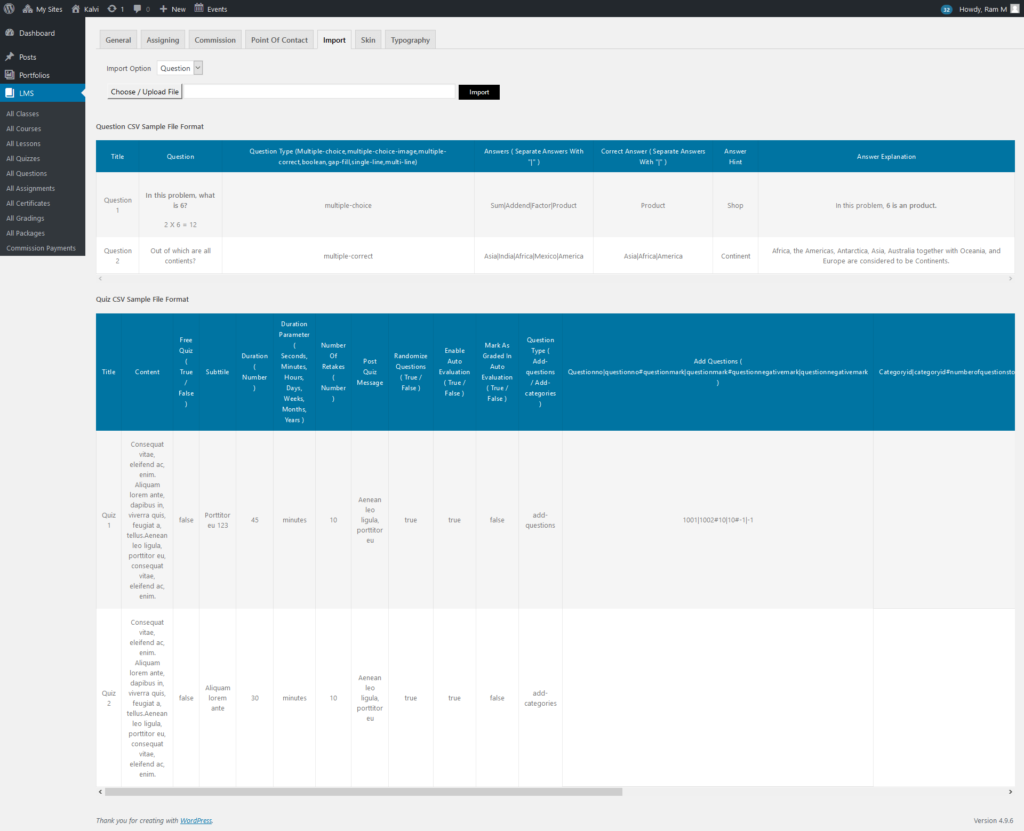
Import
In Import settings tab you can import Questions and Quizzes in CSV file format. Select the type (Question / Quiz) of item do you need to import from Import Option dropdown and click Choose / Upload File button to select the type of CSV file from your media library, then click “IMPORT” button to import the selected type of the file content to your desired section.
The sample file format is attached with the theme files itself. Just build your contents with that sample file format. You can add as many as records in the csv file and import it using this option. Please have a look.
The sample files will be inside the folder import-sample-files in the LMS Addon plugin files. The files names will be Questions.csv, Quizzes.csv.

Skin
In skin settings tab you can customize the skin color settings for “LMS Add-on”. Select the colors for the LMS Add-on primary color, primary alternate color, secondary color, secondary alternate color, tertiary color, tertiary alternate color for DesignThemes LMS Add-on module skin and also you can select quiz timer foreground color and quiz timer background color.
You can choose your own colors from the desired color palette for the above DesignThemes LMS Add-on module skin. Mostly the Primary Color, Secondary Color and Tertiary Color will be used in the Course listing and Class listing pages. And also in the Course Category pages. The alternate colors of Primary, Secondary and Tertiary will be the text colors and the Primary, Secondary and Tertiary colors will be the background colors.
Note: Following colors will be used as default colors for ” LMS Add-on”.
Primary Color – You can choose your own primary color for module skin.
Primary Color – Alternate – You can choose your own primary alternate color for module skin.
Secondary Color – You can choose your own secondary color for module skin.
Secondary Color – Alternate – You can choose your own secondary alternate color for module skin.
Tertiary Color – You can choose your own tertiary color for module skin.
Tertiary Color – Alternate – You can choose your own tertiary alternate color for module skin.
Quiz Timer – Foreground Color – You can choose your own quiz timer foreground color.
Quiz Timer – Background Color – You can choose your own quiz timer background color.
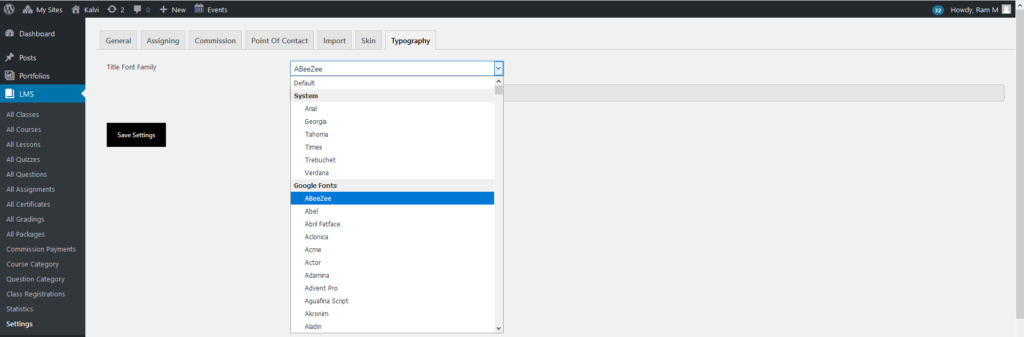
Typography
From the Typography settings tab you can select the Title Font Family for the courses and classes details page. You can select the default font family as well the google fonts from the dropdown list available.